
Do not index
This Marvel SNAP Pool 2 Deck guide is part of a compendium of decks new players can create and improve. The core idea of this guide is to help the new player experience by giving tips on how to play these decks and enhance them as you complete your Pool 1 Marvel SNAP collection by acquiring new cards.
The full list of decks can be found in these specific articles: Pool 1 decks & Pool 2 decks. As an additional resource, you can sync your collection using the Untapped.gg Deck Tracker and check out our Pool 1 & Pool 2 deck pages, where you can find decks you can build right away with the cards you own. Furthermore, you can check how popular and powerful they are in the metagame with our Global stats. That being said, let’s jump into the guide.
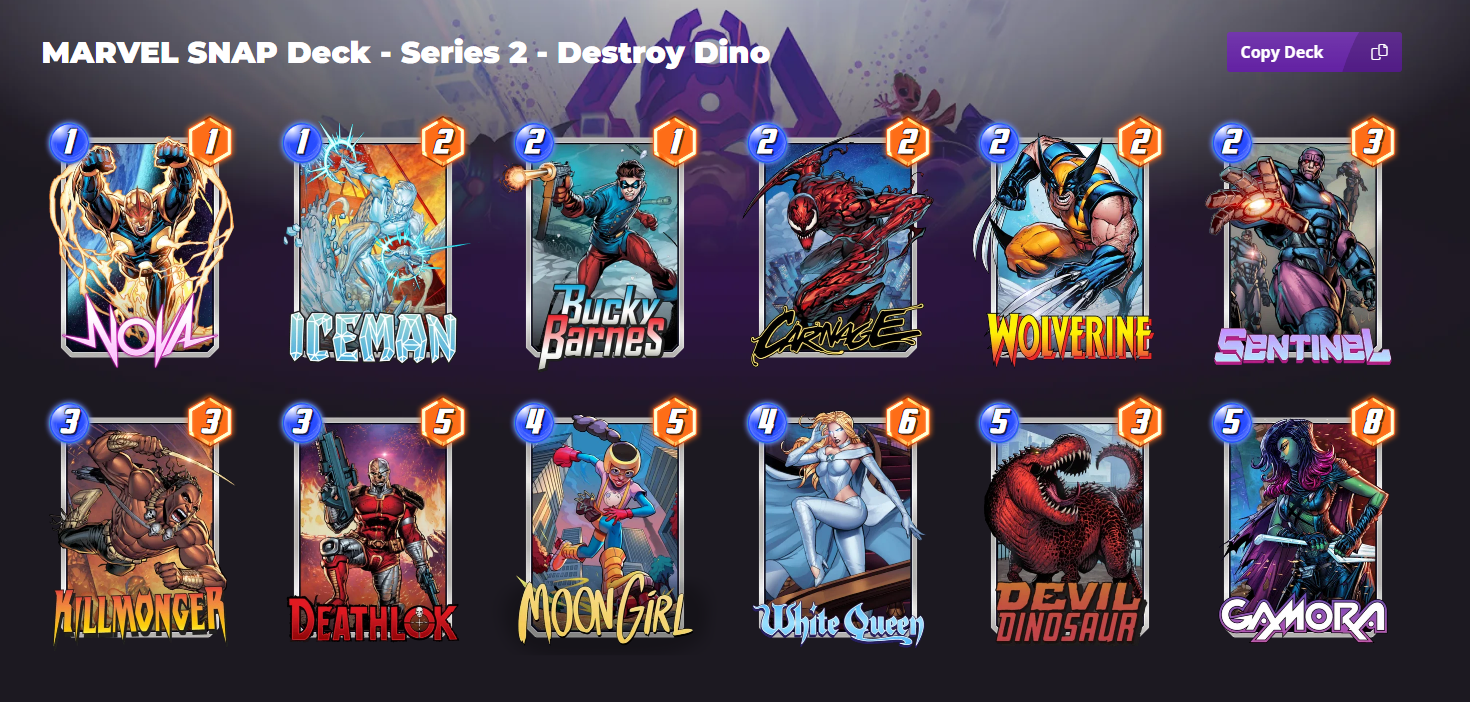
Marvel SNAP Series 2 Deck: Destroy Dino
General Gameplan
The general plan with this deck is to take advantage of our Destroy card synergy early to apply a lot of power efficiently to the board and follow it up with a large amount of power with a pair of Devil Dinosaurs at the end. Unlike the Good Cards Dino deck, this deck provides us both ways to mitigate locations that generate garbage tokens on our side of the board as well as countering opposing 1-drops like Sunspot and Nightcrawler.
This deck is susceptible to getting shut down by an opposing Armor and Cosmo in the early turns, so it is important to try and maintain priority turns 1-4. In the event we don't draw our Destroy cards, we are able to default to a standard big hand size strategy using Sentinel to give us decent early power.
Card Breakdown
Devil Dinosaur: The big payoff in this deck, using the card generation synergies Dino will regularly hit the board for 13+ power. With Moon Girl, you can play two of them, which is incredibly difficult for opponents to outpower.
Moon Girl: She serves two purposes in this deck. The first is to get you a second Devil Dinosaur. The second is to help fill up your hand so that Dino has as much power as possible.
White Queen: Another card generator with great stats, White Queen can also help you get a powerful card to close out the game when you're unable to draw your own.
Carnage: One of our three primary Destroy enablers, Carnage typically does not want to be played on T2. Rather, we want him to be destroying either our Bucky Barnes or Wolverine and even our Nova if we have a few other cards on the board already. He also provides a great way to both make space and get buffs from locations like Savage Land and Central Park, consuming the 1-power Raptors or Squirrels for +2 power each.
Deathlok: The second of our Destroy enablers, Deahtlok is an over-statted 3-cost card, unlike Carnage who wants to destroy as many cards as possible. We typically only want to hit our destroy synergy cards (Bucky Barnes, Wolverine, Nova) with him when possible.
Killmonger: The last of our Destroy enablers, Killmonger is the weakest of the three in terms of applying power on our own board, as he only interacts with our Nova. However, unlike the other two, he destroys cards on the opponent's board, allowing us to destroy an opposing Sunspot, or completely decimate an unwise Kazoo player. It also allows us to take out an opponent's Nightcrawler that snuck into a Sanctum Sanctorum, providing a surprise win on T6.
Bucky Barnes: Understated at 1 power for 2 energy, destroying him with either our Carnage or Deathlok gives us the Winter Solder with a whopping 6-power. Typically, he should be played either in a lane by himself, or with some 1-cost cards/Wolverine if we have Carnage in hand so that we only destroy the cards that generate power. We don't want to be destroying our Sentinels or a Monster from Monster Island.
Wolverine: While only 2-power for 2 energy, we will regularly be able to destroy him and trigger his ability with Deathlok and Carnage, making him an effective 2/4. Furthermore, he provides a body for Carnage that we are more than eager to eat.
Nova: While underwhelming at 1 power, destroying him at the right time can buff our whole board; he will regularly give us 6-8 power. He also synergizes well with Killmonger, allowing us to buff our board at the same time as we destroy 1-drops on our opponent's side.
Sentinel: The third card generator, Sentinel allows you to apply power to the board consistently while keeping your hand full for Dino. Typically, you don't want to play him if you have your destroy synergies in hand, but he provides you something to do if you have an otherwise bad hand.
Iceman: He provides great disruption to your opponent. Don’t underestimate the power of forcing your opponent to play cards a turn later than they normally would.
Gamora: Gamora is a fallback plan if you don't draw your Devil Dinosaur. She applies a ton of stats for her cost.
Substitutions
Example Sequence
T1: Nova / Iceman
T2: Bucky Barnes / Wolverine / Sentinel
T3: Carnage + 1-drop / Deathlok
T4: Moon Girl / White Queen
T5: Devil Dino
T6: Devil Dino / Gamora / Killmonger + 3 more energy worth of cards
For more Pool 1 and 2 Marvel SNAP Dino decks, you can check our Decks page to find those you can build with your collection
Additional Resources
About this article
This article was written by several contributors from the Marvel SNAP’s Official Discord Wiki Team. The Wiki Team is a group of community members who work on and contribute articles to Marvel SNAP’s Discord Wiki. Learn more about this program.
Post Changelog
- [4/13/2024] Introduced
Contributors
[TVN] Crash I $48 Spent
Sigphale